Turkey Two Ways
1/8/2022 | 27m 15sVideo has Closed Captions
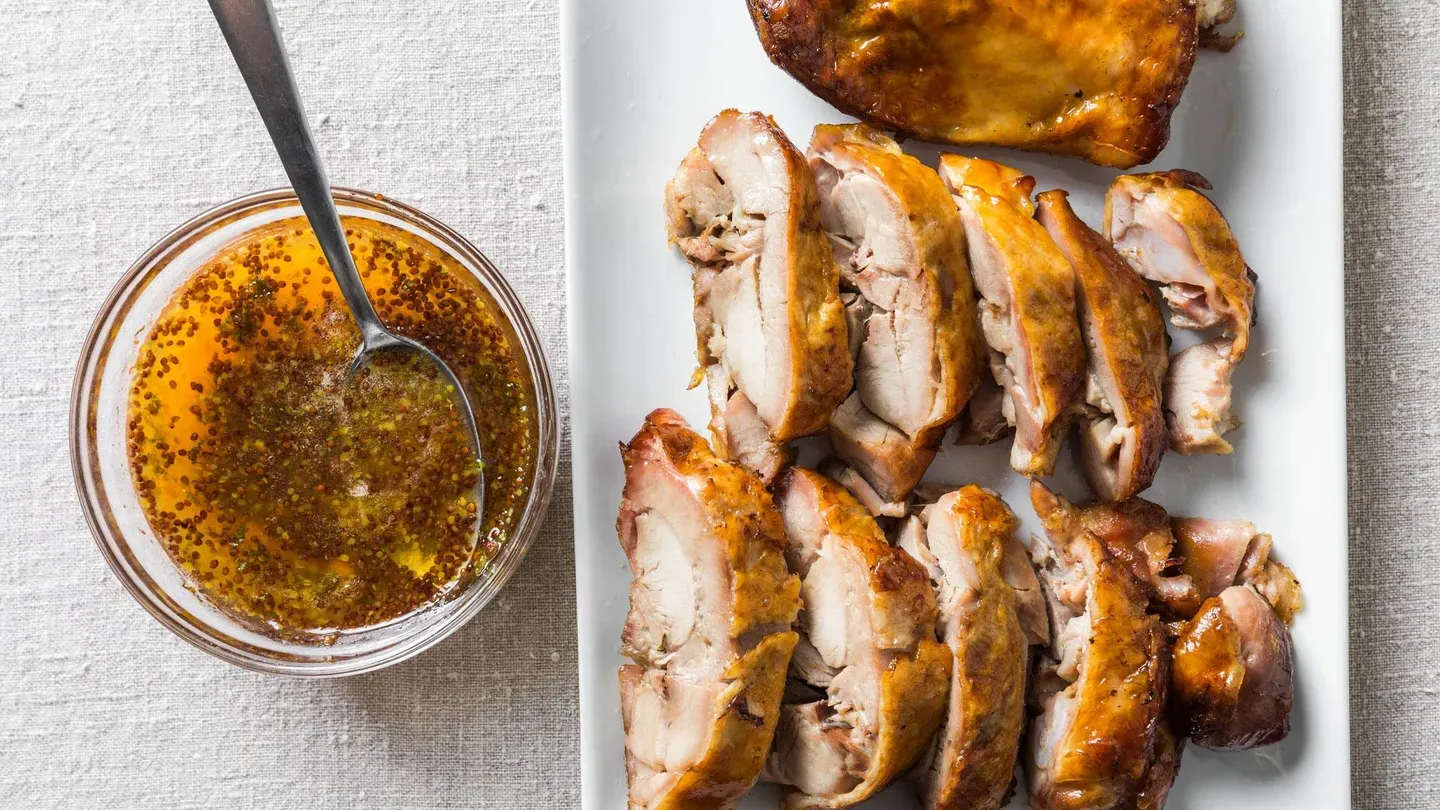
Turkey Thigh Confit with Citrus-Mustard Sauce and perfect Skillet Turkey Burgers.
Host Bridget Lancaster makes host Julia Collin Davison Turkey Thigh Confit with Citrus-Mustard Sauce. Tasting expert Jack Bishop challenges Bridget and Julia to a tasting of cranberry sauce. Test cook Becky Hays makes Bridget the perfect Skillet Turkey Burgers.
Problems with Closed Captions? Closed Captioning Feedback
Problems with Closed Captions? Closed Captioning Feedback
America's Test Kitchen is presented by your local public television station.
Distributed nationally by American Public Television
Turkey Two Ways
1/8/2022 | 27m 15sVideo has Closed Captions
Host Bridget Lancaster makes host Julia Collin Davison Turkey Thigh Confit with Citrus-Mustard Sauce. Tasting expert Jack Bishop challenges Bridget and Julia to a tasting of cranberry sauce. Test cook Becky Hays makes Bridget the perfect Skillet Turkey Burgers.
Problems with Closed Captions? Closed Captioning Feedback
How to Watch America's Test Kitchen
America's Test Kitchen is available to stream on pbs.org and the free PBS App, available on iPhone, Apple TV, Android TV, Android smartphones, Amazon Fire TV, Amazon Fire Tablet, Roku, Samsung Smart TV, and Vizio.
Providing Support for PBS.org
Learn Moreabout PBS online sponsorship♪♪ ♪♪ ♪♪ ♪♪ -Today on "America's Test Kitchen," Bridget makes Julia the perfect turkey-thigh confit with citrus mustard sauce.
Jack challenges Julia and Bridget to a head-to-head tasting of cranberry sauce.
And Becky makes Bridget updated skillet turkey burgers.
It's all coming up right here on "America's Test Kitchen."
"America's Test Kitchen" is brought to you by the following.
Plugrà European-style butter was created for all chefs, cooks, and bakers.
Slow-churned with 82% butterfat for a smooth texture and more pliability for flaky crusts.
Plugrà -- from professional kitchens to your home.
Sailing with American Queen Voyages brings you to mighty rivers and unique expeditions, where passionate explorers can discover the continent of North America.
You can learn more about our voyages at AQVoyages.com or contact your travel advisor.
Sur la Table, where you can discover an assortment of provisions for your next meal or gathering, from cookware and tools from a wide variety of kitchen brands to hands-on cooking classes.
Visit us at surlatable.com.
♪♪ -There are many ancient methods for preserving food that have stood the test of time despite the invention of the refrigerator.
And these methods last because they add flavor and texture to otherwise simple ingredients.
Confit is a good case in point, and today Bridget's gonna tell us more.
-I am here to represent ancient cooking techniques and preservation techniques.
-[ Laughs ] -We are going to use confit to really elevate turkey so it's gonna really make it special.
You can use this for Thanksgiving or any time you have a special occasion.
So let me take you through the process.
This is 4 pounds of turkey thighs.
They're full of collagen.
And during cooking that's gonna convert into gelatin, so you get that really rich and silky texture.
-Okay.
-The first process when making confit is you want to cure the meat.
Now, curing usually involves salt -- lots and lots and lots of salt, and you pack the meat, and you let it sit over time.
That salt starts to work its way into the meat and really give it a different texture.
We're going to use the time factor, the fact that this is going to cure for several days, to add some flavor, as well.
So, I've got onions.
-A lot of onions.
-A lot of onions.
This is three large onions.
And I'll add this into my food processor.
And now we're going to add a little bit of flavor here.
12 sprigs -- stems, leaves, and all -- fresh thyme.
There's tons of flavor in those sprigs.
So, now we need to get to the curing agent, and that is salt.
This is just plain table salt.
We're using 2 1/2 tablespoons.
4 1/2 teaspoons of sugar.
It's going to really balance out the flavor.
And 1 1/2 teaspoons of black pepper.
-Gesundheit!
[ Both laughing ] -I'm going to let this process for about 20 seconds, but I'm looking for the onions to be finely chopped.
Alright.
Looking pretty good.
So, I've got a 9x13" baking dish.
You want to use something that's nonreactive, since the meat and the onions are gonna be in there for a little while.
We're gonna take a third of this mixture, plop it in there, and just spread it out in the bottom of the pan here.
And now 4 pounds of bone-in turkey thighs just goes right on there.
We want to make sure that they are all in one layer, meat side down so that they're nestled in that onion mixture.
I'm going to add the rest of this onion mixture right over the top.
I'm gonna put a little bit of plastic wrap on this.
We're gonna need a little bit of time for all these water-soluble compounds to work their way into the meat.
-Now, we say a little bit of time.
How much time?
-4 days.
-[ Laughs ] So you have to plan in advance for this.
-You do.
It's a minimum of 4 days really to allow that flavor to get to the bone and the salt, as well.
But you can leave it in the fridge for up to six days.
If you're planning ahead and six days works out better for you, no problem.
-So in order to make a turkey confit with a deep, savory flavor and tender texture, you first have to cure the meat.
Now, here's how curing works.
Before cooking the turkey thighs, we coat them with salt paste and let them sit in the refrigerator for 4 days.
Now, as the salt dissolves, it naturally moves from places of high concentration to places of low concentration by winding its way between the meat fibers.
This is called diffusion.
As the salt passes through the meat, it makes it firmer and juicier.
Now, 4 days is not long enough for the salt to be perfectly even throughout.
That can take weeks.
But it's plenty of time for this recipe, because we're curing for flavor, not for preservation.
♪♪ -After 4 days of curing, this is what the turkey looks like.
-Interesting.
-Now, I've rinsed off three of them.
-Mm-hmm.
-One's still in there.
-You can see the meat is a little bit darker in places.
-Yeah.
-That's totally normal.
-Okay.
-If you wouldn't mind turning the water on, I'm going to rinse the rest of these aromatics, the onion mixture, off.
I'll go ahead and scrape some of it.
And just rinse it under running water.
I just want to get any particulates off of the turkey, because we're gonna get ready to put it in fat.
-Gotcha.
-And I don't want anything to go in there to start to brown.
-That make sense.
-Alright.
So that looks great.
-Thank you.
-Mm-hmm.
-I'm gonna move it over here.
I need to blot these dry as much as I can.
And we'll flip them over.
-They're resting on paper towels.
That's smart.
-Let's talk about what's in the measuring cup.
This is pure duck fat, which is traditional for making confit.
Now, you could use chicken fat if you don't have a source for duck fat.
You can actually buy it online now.
-Mm-hmm.
-Or you can use vegetable oil.
Again, 6 cups total.
But really, duck fat is the premium choice here.
And I'm gonna show you that you can reuse it again.
-Okay.
-So it's not just like you're gonna break the bank here and never see it again.
It will come back and serve you time and time again.
Okay, so 6 cups.
Going to add it to my Dutch oven here.
Just scoop it in there.
Gonna put this over medium heat, and we're gonna melt the fat.
Now, we're not going to fry this.
We're going to start the confit.
So, we want a really low temperature to start, and that's going to be 165.
-That's very low.
-Very low.
That's on purpose.
-Okay.
-Alright.
So let's check the fat here.
And we are looking for right about 165.
Alright.
165.
-Just barely melted.
-Just barely melted.
So we're gonna go ahead and add our turkey in there.
-Mm-hmm.
-Skin side down.
It's a really low heat, so you're not going to see any vigorous bubbling.
Again, we're not frying.
Taking my time to make sure that they're fully submerged.
A lot of people might be scared seeing all that meat going into fat and thinking, "That's going to be greasy."
But the meat really doesn't suck up the fat.
In fact, the fat allows the moisture in the meat to stay inside the meat.
Just really, really gentle heat.
Now, a couple of additions here.
Two bay leaves and a whole head of garlic.
Cut it right in half.
You're gonna nestle those down in there.
So, we're done with stovetop cooking.
-Okay.
-Don't need it anymore.
We're gonna move this operation to the oven.
And it's really low -- 200-degree oven.
If it was at a higher temperature, it might start to simmer a little bit.
-Mm-hmm.
-We don't want that.
It's gonna cook for four, maybe up to five hours.
And what I want to look for is the meat to become nice and tender.
♪♪ -Well, I don't see any bubbling.
-[ Chuckles ] -We're bubble free.
So I just need to check the turkey and see if the meat is really, really nice and tender.
So I'm gonna take a metal skewer, pierce it into the meat, and it really shouldn't pull up from the bottom of the Dutch oven.
Like that.
Turkey is nice and tender.
Need to get it out of the pot.
You can use tongs for this, but I like to kind of zhuzh it onto a little skimmer here, just to support it.
And then we're gonna put this onto our rack.
I don't want to disturb the skin.
The skin is really rendered and very, very thin at this point.
-Ooh, it is delicate skin.
-Isn't that?
-Yes.
-That's really well-rendered.
All of that turkey fat that was underneath the skin is in the pot, making the duck fat even more tasty.
So now we need to deal with what to do with this duck fat.
I see kind of a layer of turkey juice underneath the fat.
-So we need to separate the two.
I'm just gonna strain this mixture through a fine-mesh strainer over a bowl.
Alright.
So now we want to separate the fat from the juices.
And I'm going to use something called a fat separator for such a job.
There we go.
And I'm gonna have to do this, obviously, in batches.
So I'm gonna let this sit for about five minutes, allow the fat to separate.
And then we'll pour it off.
Alright, Julia.
You got to keep them separated.
-Those are two beautiful bowls of golden liquid.
-That's right.
I've separated all the fat from this beautiful liquid.
And you can see not a lot came out during cooking.
That's good.
That means it's still in the turkey.
-And that's an intensely flavored broth.
-It sure is.
Now, we're gonna use some of it at this point to make a kind of sauce.
We're doing something a little bit different from a gravy here.
I think you're gonna like it.
So, I need 4 teaspoons of this beautiful turkey broth.
And I'm going to add it to 1/2 cup of orange marmalade.
-Okay.
-We got that backbone of the turkey broth in there, some brightness from that orange marmalade, a little sweetness, too.
Now, the marmalade is a little thick, a little chunky.
-Mm-hmm.
-So I'm just gonna pop this in the microwave for about 30 seconds until the marmalade is nice and fluid.
A few bits in there, but that is the marmalade.
-It's steaming.
-Let me just whisk this together.
So, to this, I'm going to add some whole-grain mustard.
This is 2 tablespoons.
And 2 tablespoons of freshly squeezed lime juice.
That is 3/4 teaspoons of fresh-grated lime zest.
Oh, you can smell it as soon as it hits there.
-Mm-hmm.
-Alright.
A little salt.
This is 1/4 teaspoon of table salt.
And 1/8 teaspoon of cayenne pepper.
Alright.
So that looks phenomenal, smells great.
So, I've hiked the oven temperature to 500 degrees.
Really good blast.
And these are gonna go in there until they're really deep brown.
That's gonna take maybe 15 minutes.
♪♪ Whoa.
-Goodness.
That went from zero to 60 like that.
-That is the payoff.
15 minutes, a 500-degree oven, and look what a change.
Alright, but we do need to let this cool down, allow any of those juices to be reabsorbed into the meat.
And of course, cool enough for us to eat.
15 minutes is plenty of time to let these cool down.
And they are still hot, but cool enough to handle.
And that's really important, because we want to make a nice presentation of these.
Alright.
So I'm gonna flip this over.
And we want to remove this bone.
So I'm gonna take a paring knife, and I just want to eke it around the bone.
I mean, it's basically popping out.
Look at that.
Oh!
That's a good sign.
And I'll flip this back over.
And now we want to take care to preserve the skin, so you can use a slicing knife or a really, really sharp chef's knife -- something that's really gonna cut through easily.
So I'm going to make the cuts perpendicular to where the bone was.
Just makes it really pretty slices that way.
And I'm gonna cut 3/4-inch slices.
Oh, look at that meat.
It is so tender, almost falling apart.
-You can see steam coming out of there.
That turkey thigh is still hot.
-Super juicy.
Look at that.
I've got to go ahead and bone out these turkey thighs and then slice them, too.
-Alright.
-What do you think?
-I think I'm hungry.
[ Laughs ] -Right.
How many pieces would you like?
-Yes.
-Yes.
Alright.
Let me suss you up here.
That skin is mahogany.
-I know.
It's gorgeous.
-Alright.
Because it is a very potent sauce, do a little restaurant-y thing going on here.
Can we have a moment to celebrate... -Yeah.
Go ahead.
-...all that duck fat has done for us?
-Go on.
Enjoy it.
I am diving in.
-You're already in.
-Uh-huh.
-Mmm.
Mmm!
That is the most amazing turkey meat I've ever eaten.
It is tender.
It is seasoned throughout, falling off the bone.
-I actually think it tastes like the gravy is inside the meat.
-Well, that actually makes sense, since all the juice stayed in the meat.
Bridget, this is incredible.
You coming over?
-Yes, anytime.
-Thank you.
-You bet.
To make this incredibly luscious turkey confit, coat turkey thighs with an onion salt paste and refrigerate for several days.
Submerge in duck fat and cook at 200 degrees for several hours.
Then finish in a 500-degree oven just before serving.
From "America's Test Kitchen," a decadent new take on the Thanksgiving centerpiece -- turkey-thigh confit with a citrus mustard sauce.
I can't wait to make this for people.
♪♪ -Julia, do you make homemade cranberry sauce?
-Oh, yeah.
And I like it very tart, and I like whole berries.
-Yeah.
I like the relish where you just grind everything together, the oranges and the cranberries.
-Mm-hmm.
-So homemade we both like.
But Jack is here, and he's gonna ask us to reconsider the premade stuff.
I might be a tough sell on this one.
Good luck.
I want you to have an open mind here.
-Okay.
-So, we have 4 samples.
As you can tell, two of them are what I'm going to call whole berry.
Basically, they're pieces of cranberry in number 1 and number 2.
-Alright.
-Number 3 and 4 are the jellied.
The jellied are sieved, so there's absolutely no skins.
There's no texture to it.
They're put inside the can with water and sugar and then cooked, and basically the natural pectins in the cranberries sat inside the can, and that's how you get the ridges.
So, the whole berries are cooked with sugar and with some water.
They can be sieved, and then they add back cranberry solids.
Most brands just leave the cranberries if they cook in there.
I want you to pay attention to what else is there besides cranberry, water, and sugar.
Now, those are the three essentials.
Well, when I'm making my cranberry sauce at home, I like to make Grand Marnier.
-Ooh.
That sounds swanky.
-We would know this if we had been invited.
-So, there is no Grand Marnier here, and I would say the additions here were minuses rather than pluses.
So, I'm throwing you a big hint.
Anything that you're noticing in these samples?
-Cinnamon.
That's what I taste in this one.
-Okay.
Is that a good thing or a bad thing?
-Well, I love cinnamon, but it tastes a little bit like pie filling.
-And you?
-Well, the texture of 1 and 2 is striking.
Number 1, it feels more like whole berries in jelly, where the number 2, there's really more of a sauce.
And I thought based on that, I was gonna like the saucy one more, but this one is so sweet.
The sweetness is too much for me.
The tartness of number 1 is where it's at for me.
-Okay.
And what do you guys think about these jellies?
-They taste the same to me.
-You sure about -- -Pretty sure.
-Julia never is confident.
Have you noticed that?
-I know -She has no opinions whatsoever.
-I got to say, I'm not hating them.
There's something about that retro kind of feel to it.
Spread it on a sandwich day after Thanksgiving.
-Yeah, that's what they're good for.
-I think 4 is very sweet.
-It's very sweet, but this one tastes less sweet, but it also tastes a little watery to me.
-Mm, I don't know.
-Alright.
So we're gonna pick.
-1.
-1.
And if you had to pick a jelly, favorite?
-I think I'd go with 4.
-And you?
-Number 1, for sure.
-Okay.
For jelly, it doesn't matter.
I'll take both or neither.
[ Laughs ] Well, I agree with you.
4 has more flavor, but it's sweeter.
3 is more tart, which I like, but it also is very flat, so... -Yeah.
-Let's do a little bit of reveal.
Alright.
So, number 1, you guys both picked our winner, New England Cranberry.
Simple -- water, sugar, cranberries.
-That's what it tastes like.
-Sweet, but not too sweet.
It's got a nice texture.
So, number 2, the Harry & David.
-Ooh!
-And this was pretty controversial.
Cinnamon.
Yes.
-Yeah.
-Also has port, walnuts.
-Oh!
-Walnuts.
-And it sounds nice, but honestly, it distracts from the cranberries, and so it was in the middle to the bottom of the pack.
Number 3 was Woodstock.
So, this was bland.
You thought it was watery.
It just basically didn't have as much flavor.
It was at the bottom of the rankings when it came to the jellied sauces.
And then our favorite jellied sauce, this is sample number 4.
This is the Ocean Spray.
-Quite the nostalgia in that can there.
-Yeah.
-You know it's upside down, right?
-They can it upside down.
-Do you know why that is?
-I don't know.
You guys are teaching me here.
-Oh!
Yeah, you see, this is really what you think of as the top of the can, but it's on the bottom of the label.
That so there's an air pocket at the top.
-That's right.
-So you can jiggle it out in one piece!
-And that's when you get the sound.
-Yes!
Exactly.
-[ Chuckles ] So there you have it.
If you're buying prepared cranberry sauce, look for New England Cranberry Colonial Cranberry Sauce.
-Or if cranberry jelly's more your jam, then go with Ocean Spray Jellied Cranberry Sauce.
♪♪ -Hi.
Can we talk about turkey burgers?
They're kind of dry, and often there's so many ingredients that are plopped into a turkey burger that you can barely taste the turkey at all.
And I really love turkey.
Well, if there's anyone that can convert me to team turkey burger, it's Becky.
[ Laughs ] -Alright.
I love that challenge.
But I'm up to the task.
Now, we have to start with step one, okay?
Step one, we have to make peace with the fact that turkey is not beef.
-I can totally accept that.
I actually love turkey.
-Alright, good.
The thing about turkey is it has a lot more moisture than beef.
It has about 71% versus 66% for beef.
And that can make turkey actually kind of difficult to work with.
But turkey, at the same time, can also dry out quite a bit, like you said, because we have to cook it to 160 degrees.
-That's right.
-So a little bit of a conundrum there, but we're gonna give it some special help and land on a great-tasting turkey burger.
-I know you can do it.
-Let's start with the turkey.
This is a pound of ground turkey.
And just like ground beef, you can buy ground turkey with different fat percentages.
This is 93%.
-Okay.
-So, I'm just gonna gently break the turkey up.
This is going to make it easier to incorporate all of our mix-ins, and we don't want to overwork it.
That's what makes a dense burger.
So I have 1/4 teaspoon of baking soda and a teaspoon of water.
It's gonna dissolve that to make a little potion here.
And this is going to alter the pH of the meat, and it's gonna change the protein structure a little bit so it's better able to hold on to moisture.
And then that baking soda also helps with browning a little bit, too, so get a lot of bang for our buck.
And now I'm adding 1 1/2 tablespoons of soy sauce.
That's gonna season it with its salt and also going to add some nice umami.
A tablespoon of melted butter.
And then when I add this to the cold turkey, it's gonna firm back up again, and then when we cook the burgers, that little bit of butter is gonna remelt and get in all the nooks and crannies and give us a little bit of extra buttery goodness.
-So we did need the cow.
-[ Laughs ] Yeah, that's true.
The cow is contributing here.
You had to bring that up.
Thank you, cow.
-[ Laughs ] Alright.
3 tablespoons of panko.
Now the panko is gonna sort of physically disrupt the proteins of the meat, keep them loose and tender so we don't get that dense texture.
Now, 3 tablespoons of Parmesan, loaded with umami.
It's gonna complement the umami that we added from the soy sauce.
So, we have 1/2 teaspoon of gelatin.
We're gonna sprinkle that in.
The gelatin's gonna help the meat hold on to moisture so we get that really nice, juicy sensation.
And then, finally, 1/4 teaspoon of black pepper and an 1/8 teaspoon of salt.
We just need a tiny bit 'cause we added all that soy sauce.
-Alright.
-So, I'm gonna use my hands.
I want to be gentle here, again, just to mix everything up.
Don't want to overwork it, but we do want to get all of those secret ingredients nicely incorporated.
Alright.
I think that's pretty good.
And let's make some burgers here.
-Alright.
-I'm gonna divvy this up into four portions, about four ounces each.
Want to give me a hand here?
-Sure do.
-Alright.
These need to be about four inches in diameter and a half-inch thick.
-Okay.
So not paper thin, but not too thick.
Do you have a burger technique?
-No.
I just kind of pat it until it's right.
How about you?
-I have this little thumb thing that I like to do all the way around.
-Oh, that's good.
-Yeah.
-That's good.
-So definitely not compacting too much, right?
-That's right.
You still want to use a gentle hand here.
Otherwise we're gonna work that myosin, that sticky protein and we'll up with a dense burger.
Now, I have 2 teaspoons of oil in a nonstick skillet here.
And the skillet's cold, and I know it seems a little weird.
Yeah.
[ Laughs ] But we're gonna put the burgers right into the cold skillet.
-Alright.
-So we'll make two more burgers, and then it's time to cook.
-Sounds good.
-Alright.
So, our burgers are in the unheated skillet, and I'm going to turn the heat to medium now.
If I were to add the burgers to a hot skillet, the outside of the meat would cook really fast, and it would get a little bit leathery, even, while the interior would stay cool.
This way, the burgers are gonna cook nice and gently all the way through.
So, we have medium heat here, and now we're starting to hear the burgers start to sizzle a little bit, so I'm gonna put a lid on the pan.
We're gonna cook them for 2 1/2 minutes until they start to get some nice browning on the bottom.
And a lid is kind of unusual, too, when you're cooking burgers, but that's gonna capture all the moisture and the steam that's coming out of the meat, and it's gonna help them cook nice and evenly.
Alright, it's been 2 1/2 minutes.
Let's take a peek at the undersides here.
And I have a pair of fish spatulas that makes it really easy to turn these guys.
Oh, that's beautiful.
[ Laughs ] -Ooh!
-So, if we didn't see that browning, I would put the lid back on, and we'd go another 30 seconds.
-Okay.
-But this looks pretty good to me.
-It's looking great.
-Let's put the lid on for another minute and a half, and then I assume you want cheese.
I want cheese on mine.
I mean, do I even have to ask?
Yeah, okay.
We're adding cheese in a minute and a half.
-That smells delicious.
-I know.
It smells good already.
Ooh!
[ Laughs ] -Oh, yeah.
-Okay.
It's been a minute and a half, so let's add our cheese.
Nice American cheese there.
Alright, let's give them another minute and a half, and then we'll take their temperature.
-Okay.
They look amazing.
-Mm-hmm.
-Alright.
Let's just take a quick temperature check.
-They smell amazing.
-161.
That's perfect.
-Yeah, you definitely want a well-done turkey burger.
-Yeah.
-No medium rare, no rare.
-Got to hit that 160 mark.
-Okay.
-But you don't want to go much above it.
It will eventually turn dry.
-Yes.
-So, let's put these on a plate.
We're gonna let these rest for five minutes.
-Okay.
-It's burger time.
-You've been busy in the last five minutes.
-Yeah.
I've gotten everything ready for it.
A nice little burger spread here.
You've got the buns that I toasted up for us.
-I've got the buns.
Yes.
-[ Chuckles ] -I have some pickled avocado here to go on top, and I made that in advance.
These pickled avocados were so easy to make.
-And we've got all the instructions for that on our website.
-So, a nice slice of tomato for each of us.
-Beautiful tomato.
-Yeah, very nice.
And then a nice piece of lettuce.
-Sure.
-Okay.
I mean, let's do the works, right?
-Let's do the works.
-Yeah.
-Look at that.
In the world of burgers, that's like a centerfold.
That is so tender.
-Mm-hmm.
-That is not dry at all.
It is not dry at all.
-Your eyes are kind of saying everything.
You didn't even need to speak.
I could just tell how much you liked it.
-The meat is actually silky.
It's juicy and silky, and it's really meaty.
-And it's full of flavor, right?
-Mm-hmm.
-These turkey burgers are -- I'm just gonna call them a burger.
-Yeah.
-You don't even need to mention turkey.
But you know what?
Be proud of it.
Why not?
Be proud that I'm on team turkey?
Thanks, Becky.
-You're welcome.
-Well, if you want to make turkey burgers that are actually incredibly flavorful and juicy, use a little baking soda to keep the turkey tender.
Load in umami-rich ingredients, like soy sauce and Parmesan, add richness with butter and gelatin, and start them in a room-temperature skillet for gentle cooking.
So from "America's Test Kitchen," a turkey burger that might just put the beef burger out to pasture -- Becky's skillet turkey burgers.
-That was good.
Let us help you with dinner tonight.
Visit our website any time for the newest season's fail-proof recipes, full episodes, ingredient advice, and equipment reviews at AmericasTestKitchen.com/TV.
"The Complete America's Test Kitchen TV Show Cookbook" includes every recipe, taste test, and equipment review from all 24 years.
It's our most comprehensive cookbook.
The cost is $29.99.
That's 40% less than the cover price of $50.
To order, scan the QR code on your screen, or order online at AmericasTestKitchen.com/ Complete.
"America's Test Kitchen" is brought to you by the following.
Plugrà European-style butter was created for all chefs, cooks, and bakers.
Slow-churned with 82% butterfat for a smooth texture and more pliability for flaky crusts.
Plugrà -- from professional kitchens to your home.
Sailing with American Queen Voyages brings you to mighty rivers and unique expeditions, where passionate explorers can discover the continent of North America.
You can learn more about our voyages at AQVoyages.com or contact your travel advisor.
Sur la Table, where you can discover an assortment of provisions for your next meal or gathering, from cookware and tools from a wide variety of kitchen brands to hands-on cooking classes.
Visit us at surlatable.com.
♪♪ ♪♪ ♪♪ ♪♪ ♪♪ ♪♪ ♪♪


Support for PBS provided by:
America's Test Kitchen is presented by your local public television station.
Distributed nationally by American Public Television